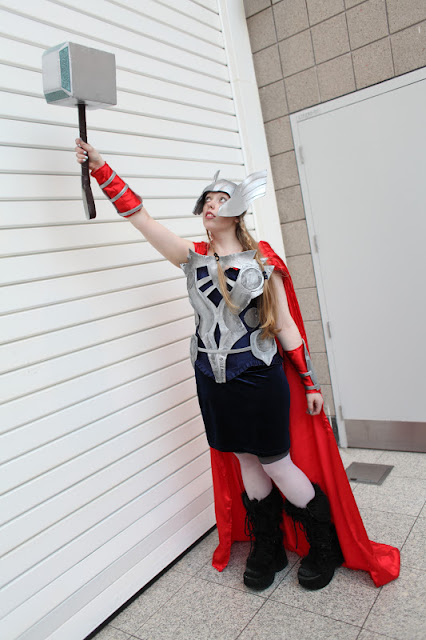
Ok so here is something a little different. I have been working on a Thor cosplay for the past few months.
I wanted to make everything, the armour, the hammer etc. For anyone unfamiliar with Thor, he has come to light lately in the Marvel film The Avengers, and also he had a film last year called Thor and the 2nd one is out next year.
To say the least I am a bit of a fan girl for him.
I have only done one proper cosplay before, it was of the Highschool Of The Dead anime. Maybe I will blog some photos of that one later.
Here is the start of my Mjolnir, Thor's hammer.
It's base is "oasis foam" you know that stuff you use for flower arranging.
not the best stuff but the only craft foam I could find really. As you may know, it falls apart so easily.So I had to stop that.
I cut my blocks into shape and glued them together.
I then coated the whole thing in like a whole bottle of plasterers pva glue, super strong stuff.
To make the foam harden.
Then cut it to shape.
I then started coating the whole thing in pollyfilla, to make a good hard smooth surface.
And I had to rub it down with sandpaper, a lot. Very tedious progress.
Found an old handle for the handle.

Sprayed it with silver metallic spray paint.
I wrapped the wooden handle in faux leather and printed out some patterns for the ends of Mjolnir
to make it look more authentic.
Here is the start of the armour.
I used a foam that cosplayers use to make armour from.
A friend and I drew out a basic shape after studying pictures of Thor.
Then cut it out in the foam.
The main idea with this foam is to make it up out of layers.
Glue the layers together.
I then coated the whole thing in glue, because it makes it more sturdier.

But what I didn't know was that the glue makes the spray paint come out completely uneven, luckily this works for worn down armour, since I had to "weather" the whole thing anyway with black paint.
There we have the finished armour.
For the helmet I bought a cheap toy helmet, but wanted to make it look more epic.
I made bigger wings out of the foam and sprayed them too.
I also made the gauntlets out of foam and sprayed them.
Used red fabric for the gauntlet part that goes under the armour.
Then used belts I sprayed silver for the ties.
Made the cape out of the same red material.
I glued the armour onto a corset, and made a matching skirt.
Recently I did a little shoot with one of my friends from uni, here is one of the photos of the finished thing.
And this was at the London MCM Expo
Thanks to Jasmine Lilly for the photos of me with the full outfit.


